sreda, 22. junij 2011

Enjoying the canoe


So far, the canoe has been on the water for about 10 days, everything from lakes, to class 1 and 2 white water on the Soča river. It handles very nice, I also did some surfing on a river wave, and it handles that with excellence. I promise to make a video of that, as it is quite a sight to see a 5m canoe surfing with such grace.
The only problem is when I am alone in the canoe, and the wind blows, but I have expected that. With the whole family in it and all the gear, it handles the wind with no problems.
It also serves as a playground for kids when we are on the beach, so, the kids love it and that is the most important!
The first scratches are there already, and I intend to put more of them on the canoe:)!

sreda, 30. marec 2011

Almost finished!


This monday, the canoe was finnaly finished, well almost, as I still have some polishing of the decks to do, but I will wait a couple more days to do that, so that the clearcoat has time to cure properly. It has been a lot of working hours since November (I stopped writing down the hours soon after the start as it demotivated me:)), so it was pretty fast and steady progress. Now I have to wait a couple of days for nice weather and then we go canoeing!!! But, I am already thinking about my next project-a wood strip sea kayak.
I sure learned a lot during the course of this canoe build, and also my father in law, who is an expert woodworker, admitted to learning a lot of new things, so it was very revarding experience for both of us. The feeling of accomplishment is amazing, and I really look forward to all the hours that will be spent on the water with the family.

And to think how it all started: I brought home a couple of sitka spruce boards:)

sobota, 19. marec 2011

Final sanding and polishing the outside


What a relief!
I've spent more hours doing the sanding and polishing as I did anything else, well, at least it seems so. But the end result is worth it in my opinion.
First I sanded the hull with 180 grit, then with 240 grit, followed by wet sanding with 320, 600, 800, 1000, 1200 and 1500 grit, and then I started polishing, first with wool and on the second pass with foam polishing pad. In the shop under the lights it looks really nice, but I will see the final result in the sun, as the sun will surely bring out some imperfections, but I really do not care, as the canoe will be used, and a canoe is not finished until it gets a first decent scratch on the hull!

sreda, 16. marec 2011

The painter holes


My original plan was to make some carrying handles for the canoe out of rope, and attach that to the decks (drill the holes trough the deck and tie the handles from the bottom side of the decks, and then seal the holes with epoxy), but the decks just look so nice, that I decide against that, as it would look out of place.
So I used the more traditional approach and drilled 15 mm holes at the bow and stern (I put the holes quite high, as I do not plan to do any lining with this canoe), and glued some copper tubing inside, and I like how it looks.

Installing the decks


After I have installed the gunnels it was time to instal the decks, and then finish the inside with one more coat of epoxy (after a lot of sanding the less then perfect glassing job on the inside). Just to be on the safe side, I sealed the gunnels and the decks with epoxy also. I decided not to finish the outwales at the bow and stern with a cut off, but rather to make them wrap around, it just looks much smoother to me, But this is just a matter of personal preference, just as are the ash inserts that I added on the outwales, to cover the screws (actually I don't think that the screws are really needed, the epoxy glue is strong enough, but they were a good excuse for the ash inserts, that add a nice nautical touch).
The seats were also installed and checked for fit, and then removed again, and they will come on when all the rest is finished. The decks that are a combination of walnut and ash, came out really nice, and after the final epoxy coat, the boat looks much nicer then I expected at the beginning of the project. Before I put the PU paint on the inside, I will do a light sanding of epoxy, but for that I need the epoxy to fully cure, so the next couple of days will be spent sanding and polishing the outside.

ponedeljek, 7. marec 2011

Installing the inner gunwales


Gunnels were made from mahogany wood, and are 16 mm wide. On the inside I made some openings to help the water run from the canoe when turned upside down, and the bottom side is at an angle. Since I could get the mahogany boards in 4m lenght only I had to make scarf joints and glue 2 pieces together. I paid attention so that the scarf joint is not where I cut out the drain openings, but rather where the invale is solid. The drain holes end approx 15 cm before the bulkheads, and they also start to get less wide (from 16 mm), and end with 5 mm width at the bow and stern. This is to make for easier curving of the wood and also for visual appeal as the whole boat gets narrower towards the ends.
I only managed to glue one invale today, as I used all the clamps on it, so tommorow comes the other one, and then the outvales.

Making the seats & bulkheads


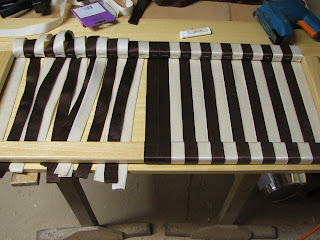
While I had to wait a couple of days for the epoxy on the inside to cure, before I start sanding, I made the seats. For the frame I decided to use ash wood as it is strong, After glueing the seat frames together I coated them with 2 layers of epoxy to seal the wood and then added another 3 coats of clear coat. I managed to find nylon webbing that matches the colors of spruce and mahogany quite well and decided to weave the seats with that. It was a little time consuming but very rewarding and I can't wait to actually put the seats in the canoe.
For the mounting I decided not to hang the seats from the inner gunnels, instead I made mahogany brackets that I epoxied to the hull, and the seats will sit on top of them. That way, I can achieve a stiffer hull, and have thinner and lighter gunwales. The only disadvantage is that the hull can not flex as much and therefore is able to absorb less energy on impact, but since this canoe will be used only on lakes and slow rivers, this is not going to be an issue. And I like how it looks also:).
I also made the bulkhead from 4 mm plywood, that is reinforced with fiberglass, and the hatches are covered with some mahogany veneer. The bulkheads will add a little weight, but they will also reinforce the hull and provide flotation chambers and some space to store gear. I secured & sealed them with epoxy, mixed with microbaloons.

Glassing the inside


After the clearcoat on the outside has dried I turned the canoe around. It now rests on counter moulds, stations 5 (bow and stern) and staion 0, which is the middle one. After a few minutes of looking at the craft in its proper position it was time to start working. First I had to remove the hot glue leftovers, which I did with a sharp chisel, and then I started sanding. Sanding on the inside is much more time consuming and requires a lot of elbow grease, as the concave curves on the inside prevent the use of random orbital sander.
After al, the sanding, I covered the inside with one coat of epoxy, and then after it dried (not completely, it was still tacky) I put on the same 163g fiberglass, but on the inside I decided to run it across the hull, and overlap the sheets by some 30 cm, which added reinforcement to the hull (like ribs on traditional birch bark canoes), and also produced less waste material. Soaking the fabric was a little more difficult than on the outside, and I got some puddles of epoxy, and some runs, but that will be corrected later (more sanding). All in all I was quite satisfied, and as epoxy hardened it became clear just how much structural integrity that added to the boat.

četrtek, 17. februar 2011

Clearcoat & paddles


After a lot of sanding, followed by some more sanding, with sanding in beetwen I finally put the firs clearcoat on.additinal clearcoats will be added when the inside is fiberglassed. I just put this clear coat for "protection", and well, I admit, to see how it will look. And it looks really nice. Before I started putting the clear coat on, I put a plastic cover above the canoe, to prevent the dust falling on the surface from above, and it helped a lot. Since I will turn the canoe around in a couple of days, and start working on inside (more sandling), I figured I deserve a break from sanding, and I made 2 paddles, different models from the ones we already have. This pair of paddles is a traditiona "beaver tail" shape from Canada, suitable for long trips on flat water. I wanted them to be light, so I chose spruce for my wife's paddle (610 grams finished), and a combination of spruce shaft and larch blades for myself (820 grams), The spruce paddle is finished (I used Tung oil ), I still need to fine sand mine, and decide on a motiv to burn into the wood, and then protect with 5 coats of Tung oil (the first is substantially dilluted for the oil to penetrate deep in the wood, next coats are gradually less dilluted, and the last 2 coats are pure Tung oil). I also made the cunter ribs, which will be mounted to the strongback and they will hold the canoe when I tur it around and start working on the inside. I see more sanding in my future:)

torek, 8. februar 2011

SANDING AND ADDING ADDITIONAL COATS OF EPOXI


After the fiberglassing was done, there were some details that bothered me, namely, you could still see where the fabric was overlaping even after 3 coats of epoxy. So, I decided to do something about that, and despite different advice, I took a grinder, with 40 grit sanding disc, and started to sand away the epoxy on problematic areas. Boy, was I nervous, as I knew that I must not sand into the fabric itself, so I was REALLY gentle and concentrated. After the high spots were taken out, I sanded the whole hull with 180 grit, to achieve a perfectly fair surface, and then I proceeded with putting on another very thin coat of epoxy over the entire hull. And it worked like magic!!!. Now, even I find it almost impossible to say where the fabric overlaps. So, working with epoxy really makes you look like a pro, even if you are doing it for the first time ( the pros would used a lot less time then I did ).
The canoe looks almost like it is finished (the outside of the hull), so I am really having no problems with letting the canoe sit for a couple of days untouched, for epoxy to fully dry, before next sanding( final sanding before putting on a first coat of 2 part PU clear coat with UV inhibitors), and just comming to the workshop to look at it. But the spring is comming, and the canoe needs to be ready by then, so, I plan turn it around and start working on the inside in the next days!